Bug Cupcakes

Ahhh! Bugs Everywhere!! Don’t worry, these are just insects made out of chocolate, no matter how creepy they look. These bug cupcakes are one’s I made for an 8 year old’s birthday party and I found the instructions from the Hello Cupcake book.

When I get requests to make cupcakes, I typically have clients wanting me to be creative and make something fun. I tried to think of what an 8 year old boy would like and came to the conclusion bugs would be a hit with only 3 days notice. 
I wouldn’t say it takes me 3 whole days to bake and decorate cupcakes, but it typically means I order takeout so I do not have to use the kitchen for anything other than baking. I bake after work one day, and depending on the type of decorations, I make them and frost the cupcakes and top them the next day. 

I admit I made these cupcakes twice. The turnaround was so quick, I needed to deliver them Thursday night, so there was no time to take photos. It was a lot easier to make them the second time since I had leftover cupcakes and M&M’s. My second attempt went a lot faster, and the secret to keeping your chocolate stencil from falling apart is by drawing it fairly thick.
To make any shapes out of chocolate all you need is a ziplock bag, wax paper, and chocolate chips. I realized after awhile that it was progressively easier to transfer the insects from the wax paper onto the cupcake if the bugs stencil was drawn on thick. The rest of the ingredients include M&M’s (peanut and regular) and chocolate covered sunflower seeds (mine were from Trader Joe’s). The yellow Spider was actually meant to have a Mega M&M body, but I had no idea those existed or where I could find them. Now that made them, I notice them in a lot of grocery stores now, but using plain M&M’s worked out for me. Once the bugs were drawn, just add M&M’s and place in the fridge to harden. Use a spatula or butter knife to help remove the bugs from the wax paper and place on frosted cupcakes.

What do you think? Are these cupcakes just bugging you out, or do they look tempting? If these bug cupcakes aren’t your thing, take a look at my fashion picks inspired by these cupcakes below.
Until next time,
Brandy| BLOGLOVIN | FACEBOOK |  INSTAGRAM |TUMBLR | TWITTER | 

Fall Acorn Cupcakes

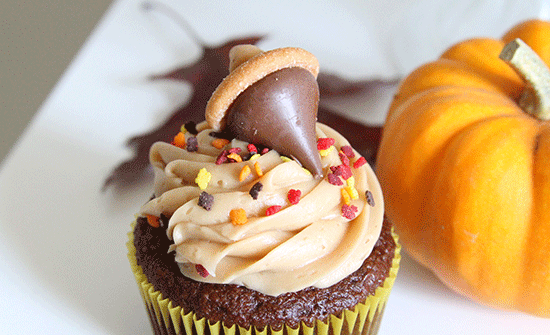
For a little friendsgiving get-together with my blogger friends, I made chocolate cupcakes with maple brown sugar frosting. Maple brown sugar is one of those flavors that just say Fall to me, so you are not limited to just Pumpkin flavored desserts for your Thanksgiving dinner.
These cupcakes were really easy to make. I doctored Pillsbury Devils Food Cake Mix as well as added 1 Tablespoon of cinnamon. The maple brown sugar frosting is also made by Pillsbury, and it smells amazing! Armando commented that the smell lingered in our kitchen 3 days after they were made and decorated and it made the kitchen smell delicious. This frosting is a seasonal flavor, but I am looking into making my own version of it since it would be delicious to use anytime of the year.The swirl was made using the Wilton tip 1M.
The acorn topping is made up of a Hershey’s Kisses, Mini Nilla Wafer cookies, and Reese’s Peanut Butter Chips. I saw some of these Acorn toppings on Pinterest made with Mini Nutter Butter cookies and with Pumpkin Spice Hershey Kisses as well, so you can make these in a variety of ways. The Reese’s Peanut Butter Chip can also be substituted  with Mini Chocolate Chips. I used a quart size ziplock bag for some frosting and cut a small hole to put the acorns together.
As a finishing touch, I added Wilton Fall leaf sprinkles for color. I am really happy with how these cupcakes came out and how they tasted. I recommend making these for your next Thanksgiving dinner and having some extra acorn toppings as garnish on your serving platters.

Hope you and your family have a great Thanksgiving full of delicious food and a lot of laughter.

JavaScript is currently disabled in this browser. Reactivate it to view this content.

Brandy| BLOGLOVIN | FACEBOOK |  INSTAGRAM |TUMBLR | TWITTER | 

Margarita Cupcakes

I made Margarita Cupcakes for Cinco de Mayo, but did not have a chance to share photos or the recipe since I was in the middle of my 40 Days of DVF series. Since today is Mexican Independence Day, I thought it would be a good idea to share the recipe for these. It might inspire you to make them to enjoy them after a Taco Tuesday dinner tonight.

I wanted to make cupcakes using good tequila so that I had an excuse to add another bottle to my bar cart. A lot of the recipes I found online and in my books had margarita cupcakes made without tequila though, which made me think they don’t typically come with Tequila. I stumbled upon this great Margarita Cupcake recipe by the Brown Eyed Baker, and she was just as disappointed with other recipes since they didn’t have booze. So she came up with a recipe that includes tequila in not just the cupcake, but also in the frosting! While most alcohol bakes off, the trick to having these taste like tequila is brushing on some while the cupcakes are cooling off. Of course, you can always omit tequila from the recipe, but here are the ingredients and directions for making some really boozy cupcakes. I used Silver Patron Tequila, but it is not necessary to use the same tequila. However, it is recommended to use a Blanco (silver/white) tequila for this recipe. Now let’s get to baking!

print recipe

Margarita Cupcakesby Brown Eyed Baker September-16-2014Ingredients1 1/2 Cup All-Purpose Flour1 1/2 Tsp. Baking Powder1/4 Tsp. Salt1/2 Cup Unsalted Butter (room temperature)1 Cup Granulated Sugar2 Eggs (room temperature)2 1/2 Limes (Zest and Juice)2 Tbsp. Tequila1/4 Tsp. Vanilla Extract1/2 Cup Buttermilk1 – 2 Tbsp. Tequila (To brush cupcakes)1 Cup Unsalted Butter2 3/4 Cup Powdered Sugar2 Tbsp. Lime Juice2 Tbsp. TequilaPinch of Coarse Salt Sea SaltInstructions1. Preheat the oven to 325 degrees F. Line a standard muffin tin with paper liners; set aside.
2. In a medium bowl, whisk together the flour, baking powder and salt; set aside.
3. In an electric mixer on medium-high speed, beat the butter and sugar together until pale, light, and fluffy (about 5 minutes).
4. Reduce the mixer speed to medium and add the eggs one at at time, mixing thoroughly after each addition.
5. Scrape the sides of the bowl and add the lime zest, lime juice, vanilla extract and tequila. Mix until combined. (The mixture may start to look curdled at this point, but don’t worry, it will all come back together.) If you omit the tequila, you don’t need to add anything else in its place.
6. Reduce the mixer speed low. Add the dry ingredients in three batches, alternating with the buttermilk in two batches. Mix only until just incorporated, using a rubber spatula to give it one last mix by hand.
7. Pour batter into liners until each cup is about 2/3 full. Bake for approximately 25 minutes or until just slightly golden and a toothpick shows only moist crumbs attached. (It was recommended to rotate the pan at the halfway point, but I didn’t do that and they turned out fine.)
8. Allow cupcakes to cool for 5 to 10 minutes, and then remove to a cooling rack. Brush the tops of the cupcakes with the 1 to 2 tablespoons of tequila. Set the cupcakes aside to cool completely before frosting them.
9. To make the frosting, whip the butter on medium-high speed of an electric mixer using the whisk attachment for 5 minutes. Reduce the speed to medium-low, and gradually add the powdered sugar, mixing and scraping the sides of the bowl until all is incorporated. Give it a mix on medium speed for about 30 seconds. Add the lime juice, tequila and salt mix on medium-high speed until incorporated and fluffy. If you prefer frosting without tequila, add 1 tablespoon of vanilla extract to the frosting instead. If the frosting appears a bit too soft, add some additional sugar, one spoonful at a time until desired consistency is reached.
10. Frost cupcakes and garnish, if desired, with lime zest, an additional sprinkling of sea salt and a lime wedge.
DetailsPrep time: 25 mins Cook time: 25 mins Total time: 50 mins Yield: 12 Cupcakes

I bought about 4 limes for zest and garnish and did not use any of mine for the juice. Instead I bought a bottle of lime juice and put in about 2 tablespoons. If your lime juice is concentrated, use a little less since it might be too strong.
And there you have it! Hope your cupcakes come out looking as pretty (and tasty) as these. My coworkers thought that these really tasted like margaritas thanks to the tequila and sea salt. They are the perfect treat at the end of a warm day, and you don’t need it to be Cinco de Mayo or Grito de Dolores (Mexican Independance Day) to enjoy these.
Salud! And until next time,

Brandy| BLOGLOVIN | FACEBOOK |  INSTAGRAM |TUMBLR | TWITTER | 

Box of Valentine Cupcakes

Hope you had a Happy Valentine’s Day!
I’m glad I ended my post last week with a notice indicating I’d be busy making and decorating cupcakes. This box of mini cupcakes were made for Sasha Mak’s Love Me Love Me Not Vintage Jewelry Trunk Show last Wednesday. In honor of the upcoming holiday, I thought, what better way to display the mini cupcakes ordered through me than through a heart shaped box of chocolates!

The display was really easy to set up. I bought the box from Target and it was originally filled with chocolate turtles. It needed to be emptied and I was willing to make the sacrifice and eat some. I baked 12 mini chocolate cupcakes and 12 red velvet cupcakes in red liners and decorated with chocolate and cream cheese frosting. I made the mistake in the morning of trying to transports the cupcakes in a carrier already placed in the heart box, but disaster struck and some of them were melted by the time I got to work. Luckily, I made extra and went home during lunch to decorate some more AND better plan out how I would deliver them successfully. Biggest lessons taken from this mini-crisis was 1) always refrigerate cakes with cream cheese frosting and 2) aluminum foil shaped under a mini cupcake pan can create a stable way of transporting cupcakes in a less than sturdy container.

There was no rhyme or reason to how I decorated each cupcake except that I had a bunch of different types of sprinkles and I really wanted to use all of them. I’ll be sharing more photos of the jewelry from the trunk show in a follow-up post, but I thought the cupcakes deserved their own post since Armando took a bunch of photos of them and I am really proud of how they turned out. Hope you enjoyed the photos and are inspired to try out this idea for next Valentine’s Day.

JavaScript is currently disabled in this browser. Reactivate it to view this content.
Until next time,Brandy| BLOGLOVIN | FACEBOOK |  INSTAGRAM |TUMBLR | TWITTER | 
Aloha Cupcakes

In honor of my sister’s 21st birthday and her upcoming departure to Japan, our family threw her a Hawaiian Theme Party in her honor!
I made some cute Funfetti Cupcakes with Vanilla frosting tinted a light brown with a teaspoon of cocoa. I added crushed graham crackers to look like sand and added the cocktail umbrellas to look like umbrellas set into the sand.

It was so fun making all of these since they were so easy and the cocktail umbrellas added a lot of color. They were a perfect way to end the summer.
Enjoy my picks inspired by these tropical cupcakes.

JavaScript is currently disabled in this browser. Reactivate it to view this content.
Brandy| BLOGLOVIN | FACEBOOK |  INSTAGRAM |TUMBLR | TWITTER | 

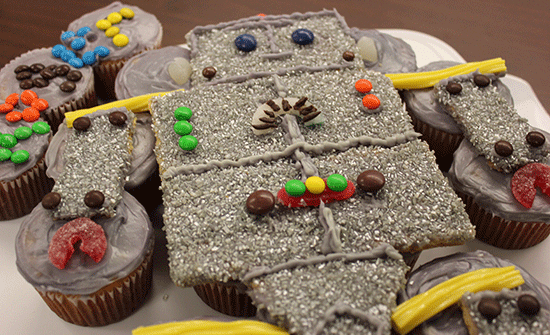
Mr.Roboto Cupcakes

I made a robot out of cupcakes for a student intern’s last day at our office. He had graduated and was able to work the Summer until the beginning of the new semester.  I wanted to make something he would like, so I chose to make this Robot from the What’s New, Cupcake? Book.
If you compare this to the one featured in the book, you’ll notice it is not an exact look alike. Sometimes you have to improvise, and I did that by using the yellow licorice to connect the arms instead of pretzel sticks. I also used spice drops rolled out and cut into circles as the knee caps instead of Nilla Wafer cookies.
The Robot’s frame is made out of graham crackers covered in grey frosting and sprinkles. I was able to make the grey frosting by adding a few drops of black food coloring into a can of vanilla frosting.

This robot has some bling thanks to the shiny grey sprinkles and the mini M&M’s being used as dials and lights. I made the claw out of a sour Lifesaver gummy and then cutting out an opening. I personalized the cupcakes by spelling out the recipients name with the leftover M&M’s. Sometimes when I decorate cupcakes I buy a big bag of candy and only use a few of them. It made no sense for me to not use the M&M’s to spell out a name when I had 3 leftover cupcakes that I frosted just to bring for the going away party. I did however eat the bag of sour Lifesaver gummies. (Don’t worry – I shared.)

Enjoy shopping my picks below inspired by this silver guy with a heart of gold.
JavaScript is currently disabled in this browser. Reactivate it to view this content.
Brandy| BLOGLOVIN | FACEBOOK |  INSTAGRAM |TUMBLR | TWITTER |