Chinese Takeout Cupcakes

I was enlisted to make some cupcakes for a going away party held in honor of a colleague leaving to China for 3 years to complete his MBA.  I thought to myself, what better way to celebrate the party than with Chinese takeout?

The cupcake idea and instructions came from the What’s New, Cupcake? book. The Chow Mein is made out of vanilla ice cream tinted with cocoa powder. The broccoli is a green tootsie roll cut halfway with scissors. I added frosting to the two branches and dipped them into a bowl with green sprinkles. The fried rice is made using Rice Krispies. All of the toppings are candies reshaped to be the ingredients for each dish.

The book had instructions on how to make fortune cookies out of melting caramel candies, but I didn’t have the time to make this many the night before. Instead, I ordered food from a Chinese Restaurant right below my apartment and ordered 2 dozen fortune cookies. I asked for extra takeout boxes and chopsticks to complete the look.

Everyone complimented my work and mentioned the cake itself tasted very good. While you can’t taste them for yourself from the screen, enjoy some of my outfit picks inspired by my colleague’s trip to China!

JavaScript is currently disabled in this browser. Reactivate it to view this content.
Brandy| BLOGLOVIN | FACEBOOK |  INSTAGRAM |TUMBLR | TWITTER | 

Vegtable Garden Cupcakes

Finally showcasing the cupcakes I made for the June wedding. It was a simple backyard affair and I was given the creative freedom to run to decorate some garden-themed cupcakes since the couple enjoyed gardening. 
I made these cupcakes using the help of the Hello,Cupcake! book. The dirt is made up of crushed Oreo cookies and the signs, or seed packets, are made out of graham crackers. Most of the veggies in the garden are made up of Starbursts or Tootsie Roll chewable candies. While I am proud of how well the vegetables came out, I am especially proud of the signs I made out of graham crackers. I covered the front with melted white chocolate and drew all the pictures with frosting by free-hand. I added the “Just Married” sign and the “S+E” with rosebuds and vines as a last minute touch instead of the shovels and recommended in the book. 
I was lucky to have found the planter’s box at Target the weekend before and it matched the fence of the venue perfectly! My initial problem with it was that the bottom was too narrow and would not allow all of the cupcakes to fit. Armando cut out a piece of cardboard and wrapped it with brown paper and placed it in the planter’s box so that all 24 cupcakes could fit. More Oreo dirt was placed between the cupcakes during our set up. I placed my business cards next to my display and the order was complete. My clients were happy with what I created for them and I was glad that all of the cupcakes made it without any accidents. That is all thanks to Armando for driving carefully to the venue. I am especially grateful that he took photos of these cupcakes.
Hope you enjoy these photos as much as I did and enjoy shopping my picks inspired from these cupcakes.

JavaScript is currently disabled in this browser. Reactivate it to view this content.
Until next time,Brandy| BLOGLOVIN | FACEBOOK |  INSTAGRAM |TUMBLR | TWITTER | 

Peanut Butter and Chocolate Cupcakes

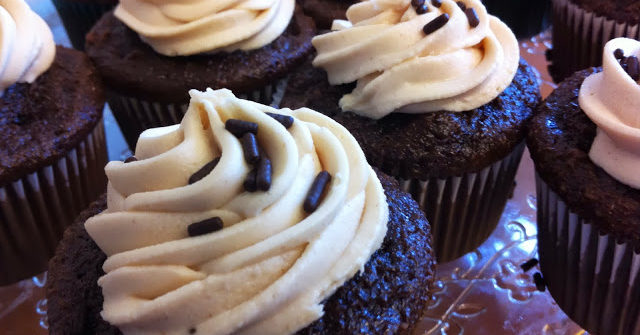
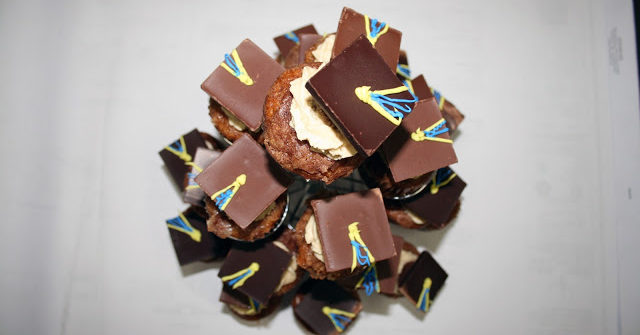
I shared photos on Instagram earlier this week of some Peanut Butter and Chocolate cupcakes and after some requests I decided to share the recipe I used to make these. I feel like I don’t post cupcakes on this blog often enough, but part of that reason is that I have been busy/ focused on the Fashion and Events portion of my blog. Then there is the constant closet clean out that makes my small, studio apartment feel claustrophobic since not all of my clothes are hanging in a closet. I hate admitting I have piles of clothes scattered throughout the apartment that I am working on selling because I consider myself a neat freak, but I blame Armando for taking up 1/3 of our closet. (Side note: he probably doesn’t even have that much space and I am probably just a clothes hoarder.)
Since I am sharing the skeletons inside (and outside) of my closet, whenever I make cupcakes I typically do not make them from scratch. (Gasp!) Shocking I know, but sometimes it is either that or no cupcakes at all and making no cupcakes is sometimes unacceptable! And who doesn’t like Betty Crocker anyway?
While I used the store-bought cake mix, I did add some unique touches that you are welcome to try (and change) to improve the cupcake.

print recipe

Peanut Butter and Chocolate Cupcakesby Brandy Saldana June-14-2013Ingredients1 Box Betty Crocker Chocolate Fudge Cake Mix4 Large Eggs1 Cup Buttermilk (substitutes water) 1 Cup Reese’s Peanut Butter Chips1 Can Vanilla Frosting1 Cup Creamy Peanut Butter Chocolate Sprinkles (optional)InstructionsFollow the directions on the box substituting the water listed on the box with a cup of buttermilk. If you are like me don’t have buttermilk readily available sometimes, you can substitute by adding a tablespoon of vinegar or lemon juice to 1 cup of milk. Let it sit for 3-5 minutes so that the milk curdles a bit. I add buttermilk to box cake mix for a denser cake which is useful when doing a lot of elaborate decorations. (If you prefer a moister cupcake, you do not have to follow the directions of adding buttermilk and an extra egg, but I thought I’d share what I did to make it firm.)

With the oven preheated to 350 degrees and the cake batter mixed well, fill up 2/3 of the paper liners in your pan with batter. I added the Reese’s Peanut Butter Chips after I filled the liners and tried to mix them in each liner to spread out evenly using a toothpick. I prefer adding small items like this at the end to spread them out evenly in each cupcake. Mixing them in the bowl first could result in the chips ending up at the bottom and leave some cupcakes without any.

While you bake and let the cupcakes cool, you can prepare the frosting. I placed half the frosting in a small bowl and half of the peanut butter. I listed 1/2 Cup total, but more can be added depending on how strong you want the peanut butter flavor. While I know how to make frosting from scratch, this is definitely easier and not as time-consuming. If you ever need to bake in a rush but still want a unique flavor, this is the way to go.

For the swirl on the cupcake I used a Wilton 1M swirl tip. I tend to not overwhelm my cupcakes with frosting so I swirled a generous amount of frosting starting from the outside going in. I do have bags by Wilton that I use for the frosting, but you can also use 1 gallon freezer bags and cut the right size hole at one of the corners to also get the job done. Add the sprinkles if you like before the frosting hardens, and then you are done!DetailsPrep time: 16 mins Cook time: 16 mins Total time: 36 mins Yield: 24 Cupcakes

My co-workers and I tested them and everyone approved so I hope they tickle your taste buds too. (I displayed them in my cubicle on a pastry plate that I purchased at Ikea.) I really hope you enjoyed my first recipe post for cupcakes and I am inspired to share more in the future. Let me know if you try this recipe or how you put your own spin on it.

Brandy| BLOGLOVIN | FACEBOOK |  INSTAGRAM |TUMBLR | TWITTER | 

“Larry the Lobster” Cupcakes

Finally some pictures of my beautiful lobster creation! I named him Larry just for the alliteration (must be the English major in me.)
This idea came from the What’s New, Cupcake? and the body is made out of sour cherry fruit slices, smashed together with more sugar, rolled out with a rolling pin, and cut using a template provided in the book. It looks easy, and the instructions are relatively easy, but it was very time consuming! The easiest parts were arranging the candies and crushing the graham cracker cookies to look like sand.
I spent about 5 hours on this project, not including the baking time.  The time I spent was well-worth it though because I made it for a nice co-worker who retired last Thursday after working at the University for 20 years. I was actually inspired by a lobster figure she had in her office and the fact that she enjoys taking boating trips with her husband. She’ll be doing plenty of that now that she has the extra time!
Hopefully you enjoyed seeing this lobster come to life. I admit I am very proud of it. I’ll be featuring photos from an event I attended yesterday, so stay tuned for that sometime tomorrow.
Brandy| BLOGLOVIN | FACEBOOK |  INSTAGRAM |TUMBLR | TWITTER | 

Graduation Cap Cupcakes

 Commencement season is upon us! (Or at least it is here at the UC.) Grads walking throughout campus snapping their photos by the entrance to Berkeley, at Sather Tower, at Sather Gate, and restaurants packed to the brim with families and friends celebrating a person’s amazing accomplishment!
It is hard to believe I experienced that a year ago. I graduated early in December 2011 and participated in all the commencement activities then, but I walked two more graduations since I was still in the area when May rolled around. I got my money’s worth out of the gown I bought and appreciated being able to experience it 3 times. Each guest speaker and speech was different, but the message was still the same: Do what you love and do it well.
I made these cupcakes last year for a student intern who was also graduating and leaving the office for bigger and better things. I made her favorite flavor of mine that I had once brought to the office before: Apple Cinnamon Streusal Cupcakes with Peanut Butter Frosting. The Caps are really easy to make and I encourage you to try them out for your grad’s celebration. These are great to put on a cupcake tower like pictured above or do what my sister did for a grad party and place them on a platter writing out the year of the graduation. 
To make the graduation caps: Place a Reese’s mini peanut butter cup upside down, add frosting to the top for “glue”, place a Ghiradelli chocolate square with the logo facing down, and add lines of frosting to create the tassel on top. I would not recommend using Ghiradelli squares that have a filling, despite being delicious, because those tend to break easily as you unwrap them. Stick to the Milk Chocolate flavor as it matches with the Reese’s Cup more. Make sure to decorate with the school colors whether it is with the frosting used on the tassels or the cupcake liners. Have fun and feel free to substitute the chocolate or the tassel decorations on top.
Congrats to the Class of 2013!  Hope life after graduation is sweet and you do what you love and do it well!
Brandy| BLOGLOVIN | FACEBOOK |  INSTAGRAM |TUMBLR | TWITTER | 

Western Theme Cupcakes

Another coworker of mine retired and in honor of her move to Nashville and love of country music we went with a western theme for her going away party. It has been awhile since I last posted some cupcakes up here on the blog and I just had to share these because they were a big hit at the office and super easy to make.

To start off, I baked some chocolate cupcakes and simply spread vanilla frosting over them. I was tempted to tint the frosting red or yellow and pipe a simple swirl, but I was afraid the cupcakes would be too tall to place in my cupcake carrier.

To make the hat: simply glue a spice gum drop with frosting onto the center of the chip. Pringles chips are the best because of their uniformity (and because they curve out like a hat.) I then used Twizzlers Pull N Peel and cut them into small pieces after measuring the gum drop. Some would not stay despite adding extra frosting to hold the Twizzler on to the chip and spice drop, so I would recommend using a small tip and piping around the spice drop. This way you are also not limited to just red.

Simple cupcakes to make for your next western party. I might recommend using sweet gum drops instead of spice ones for a better sweet and salty snack combo with the chips.

Thanks for reading and feel free to share your latest culinary confection in the comment section below.

Brandy| BLOGLOVIN | FACEBOOK |  INSTAGRAM |TUMBLR | TWITTER |